Showing posts with label inkadinkadoo. Show all posts

Wednesday, January 18, 2012

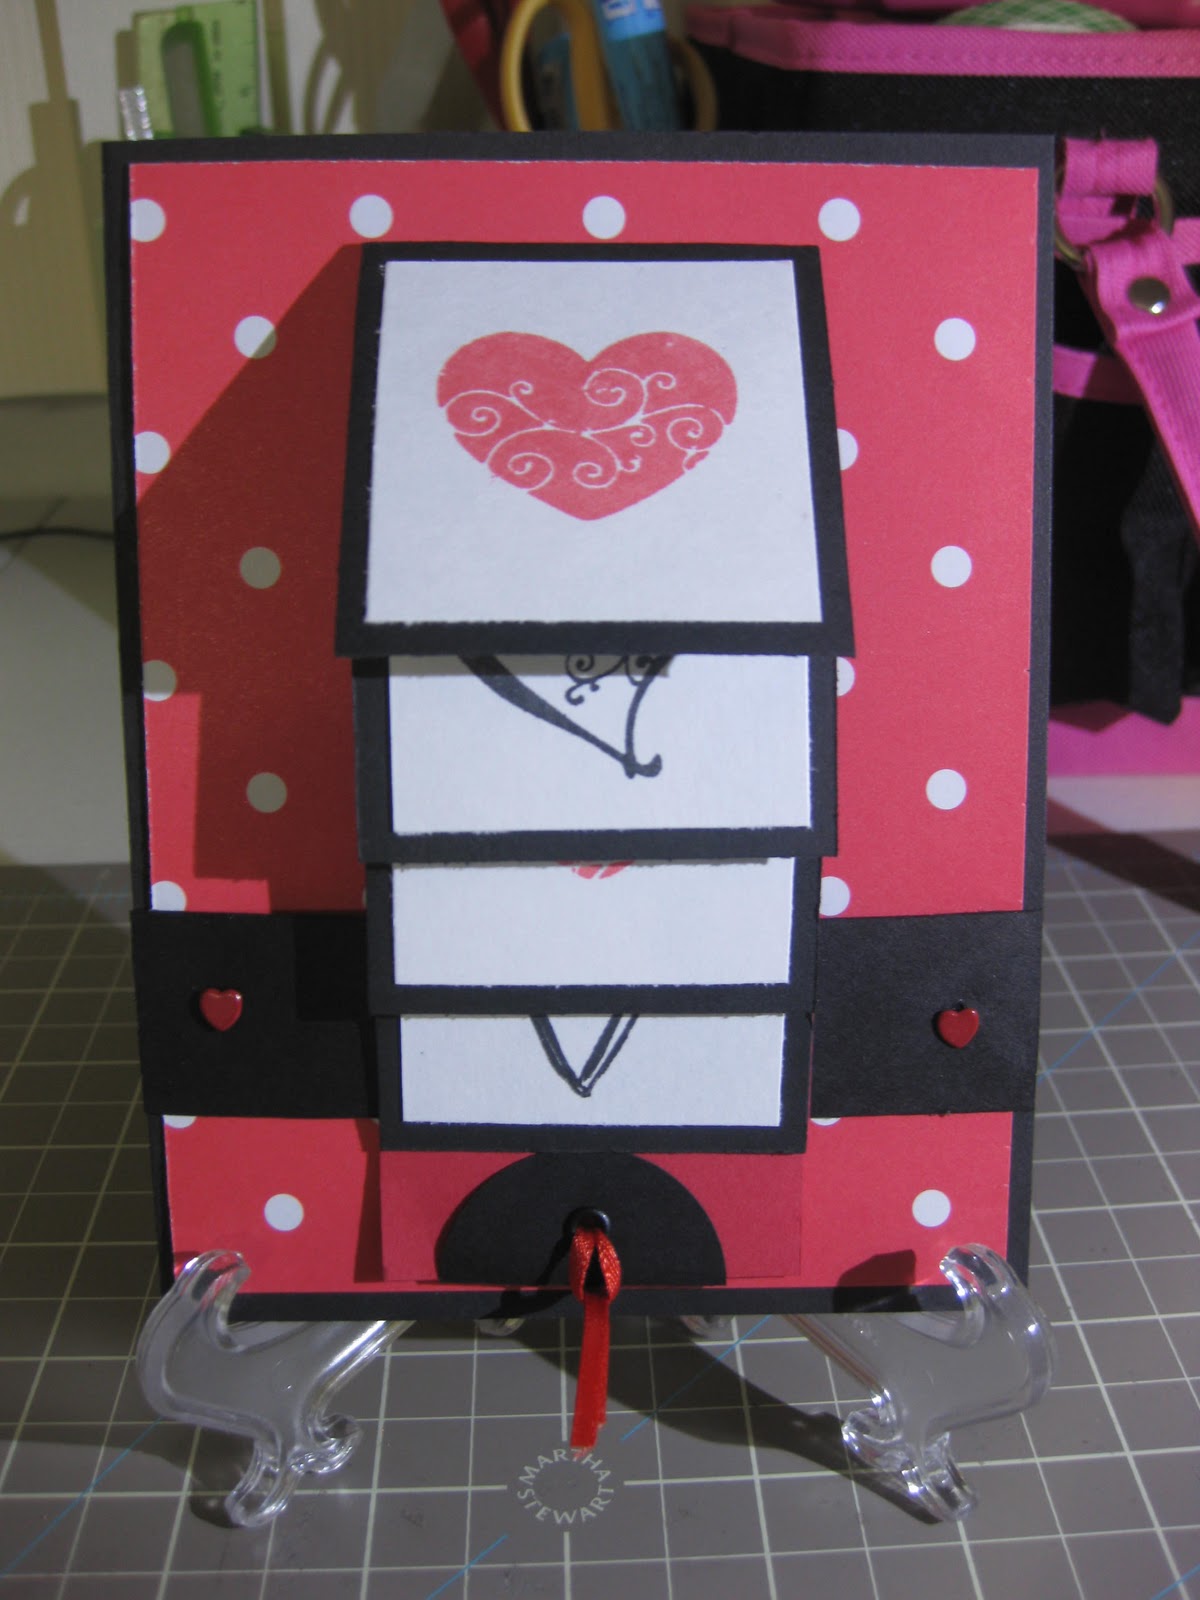
Valentine Waterfall Card

Valentine's Day is just around the corner, and I wanted to get a head start on Valentine cards.  This is a card I made for my husband, and for this card, I made a waterfall card.  I viewed a couple of YouTube videos on how to make waterfall cards, because I've never made one before. :p

The black card base is from The Paper Company (cut at 5 1/2 x 4 1/4 inches).
The red polka dot mat is from The Paper Studio (cut at 5 1/4 x 4 inches).
The white paper is from Georgia Pacific (cut at 1 3/4 x 1 3/4 inches).
The black cardstock to mat the white squares is from The Paper Company (cut at 2 x 2 inches).
The black strip is from The Paper Company (cut at 1 x 4 1/4 inches).
The red strip to hold the waterfall is from The Paper Company (cut at 2 x 9 inches).
The black circle is cut with an EK Success 1 3/8 circle punch.
The brads are from Hobby Lobby.

This heart stamp is from Inkadinkado's Hearts stamp set.
Ink is Memento Lady Bug.

This heart stamp is from Inkadinkado's Hearts stamp set.
Ink is Memento Tuxedo Black.

This heart stamp is from Inkadinkado's Hearts stamp set.
Ink is Memento Lady Bug.

This heart stamp is from Inkadinkado's Hearts stamp set.
Ink is Memento Tuxedo Black.

Here is how the card looks when the tab is pulled.

The sentiment is from My Pink Stamper.

The pull tab is made with black eyelet (Making Memories), set with the Big Bite.
Ribbon is from Michael's.

I hope my husband likes this card!

P. S.  It was my first time to use the Big Bite, and I had a little trouble following the directions.  Watching this video helped.

Tuesday, January 17, 2012

Inkadinkado Stackable Ink Pads

Around a year ago, I went on a buying spree for craft supplies, and picked up all of the Inkadinkado Stackable Ink Pads that were available at my local Jo-ann's.  I aready had Mementos and Colorbox pads, but the Inkadinkado's colors were so pretty on the pads (you could see through the container) that I just could not resist.

I haven't used them that much, but here are a few of the pads a year later.


The glue holding the pads came off, an the pads lifted off the containers.  The pads had also gotten really stiff, and are now unfortunately unusable.  I feel really sad and disappointed on these pads.  I had hoped for much better quality. :(

Friday, January 13, 2012

Card for a Cat Lover

My sister's birthday is coming up, and I made her a card with cats.  She loves cats, and owns a few of them.  When I saw this stamp set from AC Moore, I knew this would be perfect for her birthday card.


Paper is from The Paper Company
Stamps are from Inkadinkado.
Black ink is Memento's Tuxedo Black.
Markers used to color are Marvy Matchables
Background is embossed with Cuttlebug Traffic Jam embossing folder

I took the photo without the flash, which makes the card look a little washed out, unfortunately.  It looks much better in real life.

I hope my sister likes it.  I will mail it out on Monday. :)

Friday, December 23, 2011

Simple Treat Bags

Hi again!

Today is the last day of work before Christmas, and I finally got the chance to make these treat bags for my coworkers.

These treat bags are smaller than the ones I made for my husband's coworkers, because I ran out of the bigger cello bags (I used the bags to package my cards and envelopes for the craft sale).

These are what's inside the bag:
Turtles chocolate
Lindt Lindor truffles
Almond Roca
Swiss Miss hot chocolate mix

I made a topper for each bag using my Cricut (took the photo without flash).
Dark blue cardstock is from The Paper Company (cut at 4 inches x 2 inches).
Snowflake patterned paper is from Die Cuts With a View (DCWV) Christmas Stack (cut at 1 3/4 inches by 3 3/4 inches).
White cardstock is from Papertrey Ink.
Penguin stamp is from Inkadinkadoo.
Sentiment stamp is from My Pink Stamper.
Black ink is from Memento (Tuxedo Black).
The circle was cut with Cricut using Mini Monograms cartridge (2 inches).
The tag for the sentiment was cut using EK Success punch (I forgot the name, sorry).

Assembly was really quick.  After I filled the bags, I stapled the bag closed and attached the topper I put together with double-sided tape.  I then attached the hot chocolate packet on the back of each treat bag using double-sided tape.

Ta-da!  The finished treat bags:

I hope my coworkers enjoy them!

Thanks for reading, and happy holidays to everyone! :)